Table of contents
Open Table of contents
Introduction
I am currently working on an Azure project that is focused on high availability and backup and restore operations. I have never been a “SQL” person or database admin, so this aspect at first appeared a little daunting.
After digging in, I was pleasantly surprised to see that Microsoft has built-in mechanisms that make it pretty straightforward to manage the backup, retention, and restore processes.
Automated Backups
The first bit of business is to understand the backup process. This article outlines the specifics around the automated backups for SQL databases in Azure. Below are a couple of key highlights from the article.
Backup frequency
Azure SQL Database creates:
-
Full backups every week.
-
Differential backups every 12 or 24 hours.
-
Transaction log backups approximately every 10 minutes.
Backup storage redundancy
By default, Azure SQL Database stores backups in geo-redundant storage blobs that are replicated to a paired region. Geo-redundancy helps protect against outages that affect backup storage in the primary region. It also allows you to restore your databases in a different region in the event of a regional outage.
The storage redundancy mechanism stores multiple copies of your data so that it’s protected from planned and unplanned events. These events might include transient hardware failure, network or power outages, or massive natural disasters.
To ensure that your backups stay within the same region where your database is deployed, you can change backup storage redundancy from the default geo-redundant storage to other types of storage that keep your data within the region. The configured backup storage redundancy is applied to both short-term retention (STR) backups and LTR backups. To learn more about storage redundancy, see Data redundancy.
You can configure backup storage redundancy when you create your database, and you can update it at a later time. The changes that you make to an existing database apply to future backups only. After you update the backup storage redundancy of an existing database, the changes might take up to 48 hours to be applied.
You can choose one of the following storage redundancies for backups:
-
Locally redundant storage (LRS): Copies your backups synchronously three times within a single physical location in the primary region. LRS is the least expensive storage option, but we don’t recommend it for applications that require resiliency to regional outages or a guarantee of high data durability.

-
Zone-redundant storage (ZRS): Copies your backups synchronously across three Azure availability zones in the primary region. It’s currently available in only certain regions.

-
Geo-redundant storage (GRS): Copies your backups synchronously three times within a single physical location in the primary region by using LRS. Then it copies your data asynchronously three times to a single physical location in the paired secondary region.
The result is:
-
Three synchronous copies in the primary region.
-
Three synchronous copies in the paired region were copied over from the primary region to the secondary region asynchronously.

Quick side note:
-
Geo-restore is disabled as soon as a database is updated to use locally redundant or zone-redundant storage.
The storage redundancy diagrams all show regions with multiple availability zones (multi-az). However, some regions provide only a single availability zone and do not support ZRS.
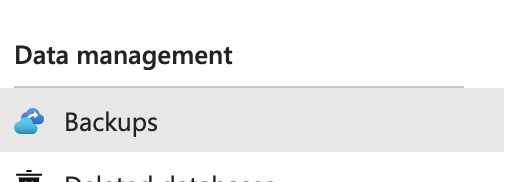
Configure Retention
To configure the retention settings, locate your SQL Server in the Azure portal. Select “Backups”, under “Data management”.
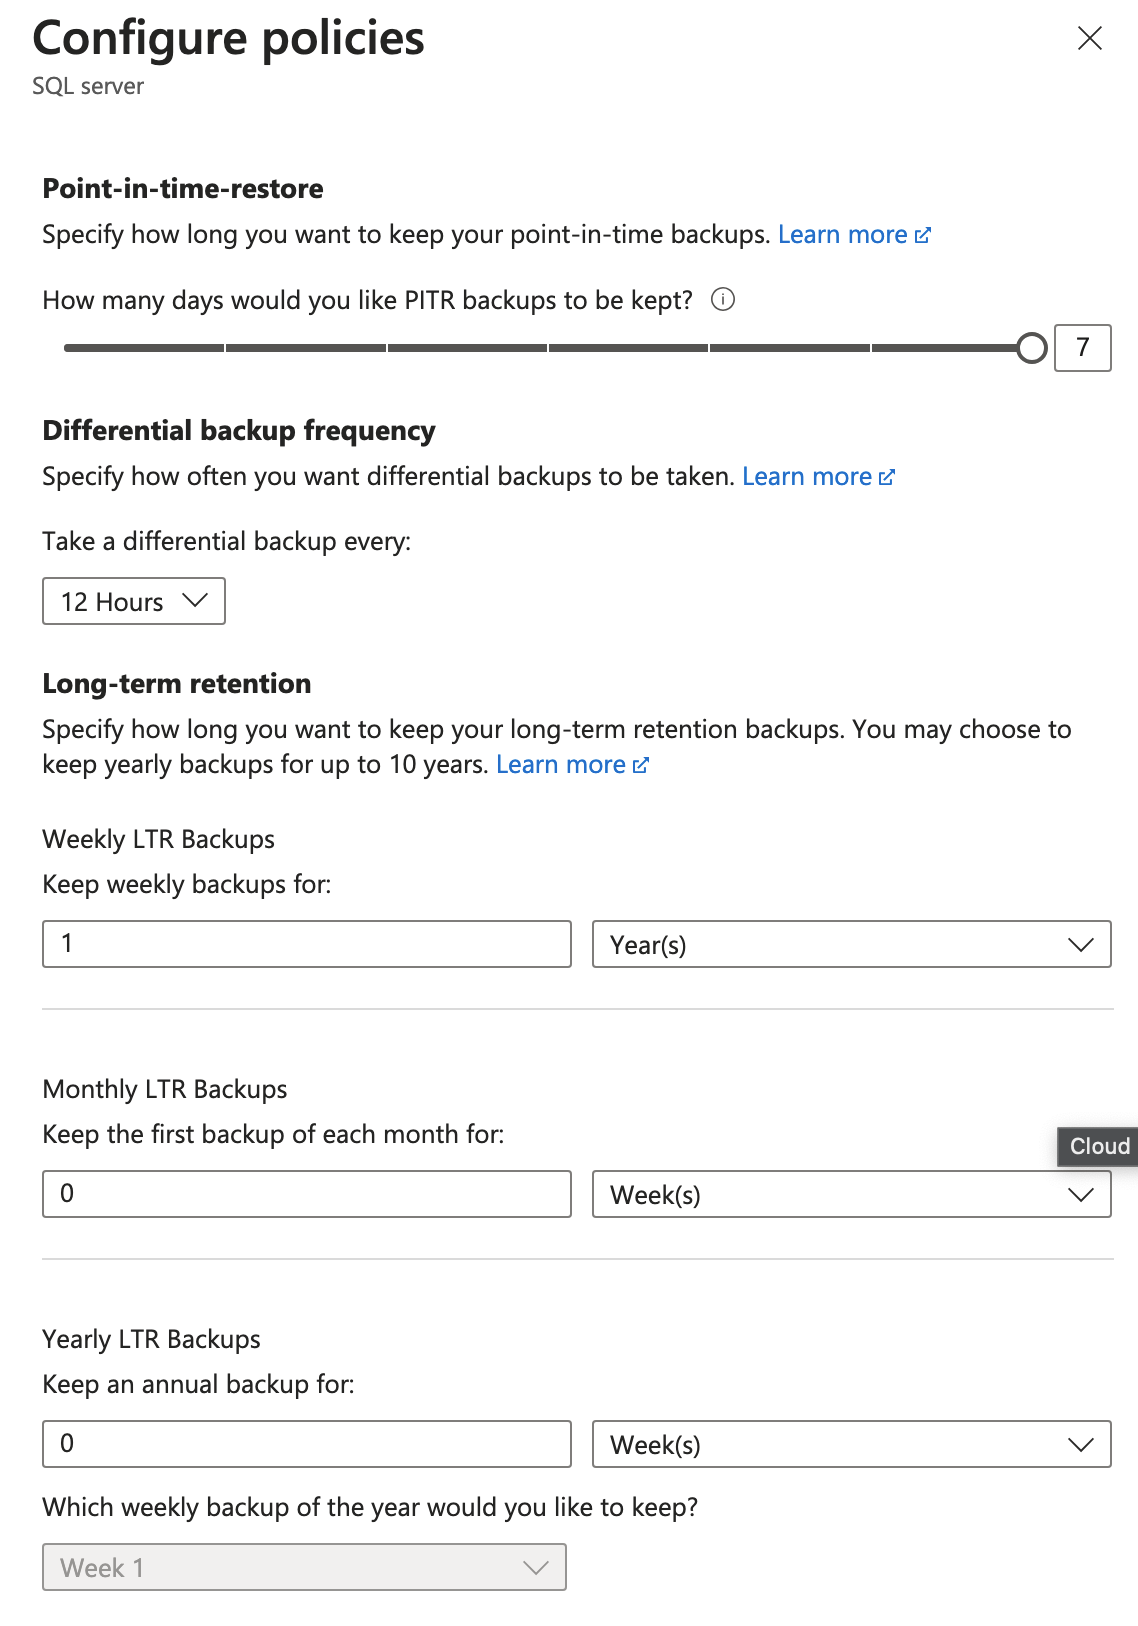
Within the “Backups” blade, you will see several details such as the available backups and you can configure the retention settings. To do so, click on “Retention policies” and select the policy you wish to configure by selecting “Configure policies”.
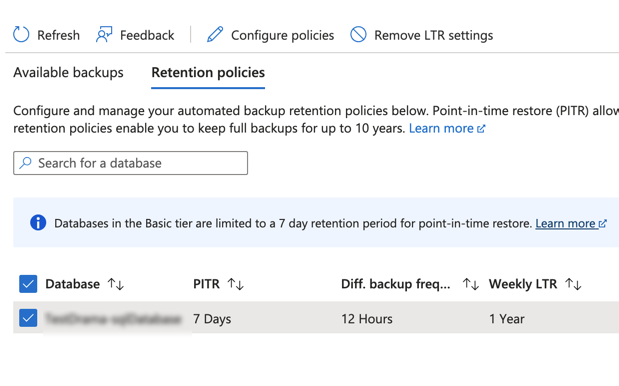
The next screen presents you with the settings. Configure them per your requirements.
Restore a Database
Overview
Point-in-time restore is useful in recovery scenarios, like for an incident that’s caused by error or failure when data doesn’t load correctly, or if crucial data is deleted. You can also use it simply to test and audit your database deployment. Azure backup files are kept for 7 to 35 days depending on your database settings.
You can use point-in-time restore to restore a database in these scenarios:
-
From an existing database
-
From a deleted database
-
To the same managed instance or a different managed instance
-
To a managed instance in the same subscription or to a managed instance in a different subscription
Restore an existing database
You can restore an existing database in the same subscription by using the Azure portal, PowerShell, or the Azure CLI. If you restore to a different instance in the same subscription by using PowerShell or the Azure CLI, be sure to specify the properties for the target SQL Managed Instance resource. The database is restored to the same instance by default.
To restore an existing database, you can do so by going to the database page in the Azure portal, and selecting Restore.
Alternatively, to restore your database, you can follow these steps:
-
Sign in to the Azure portal.
-
Go to the target SQL Managed Instance where you plan to restore your database to.
-
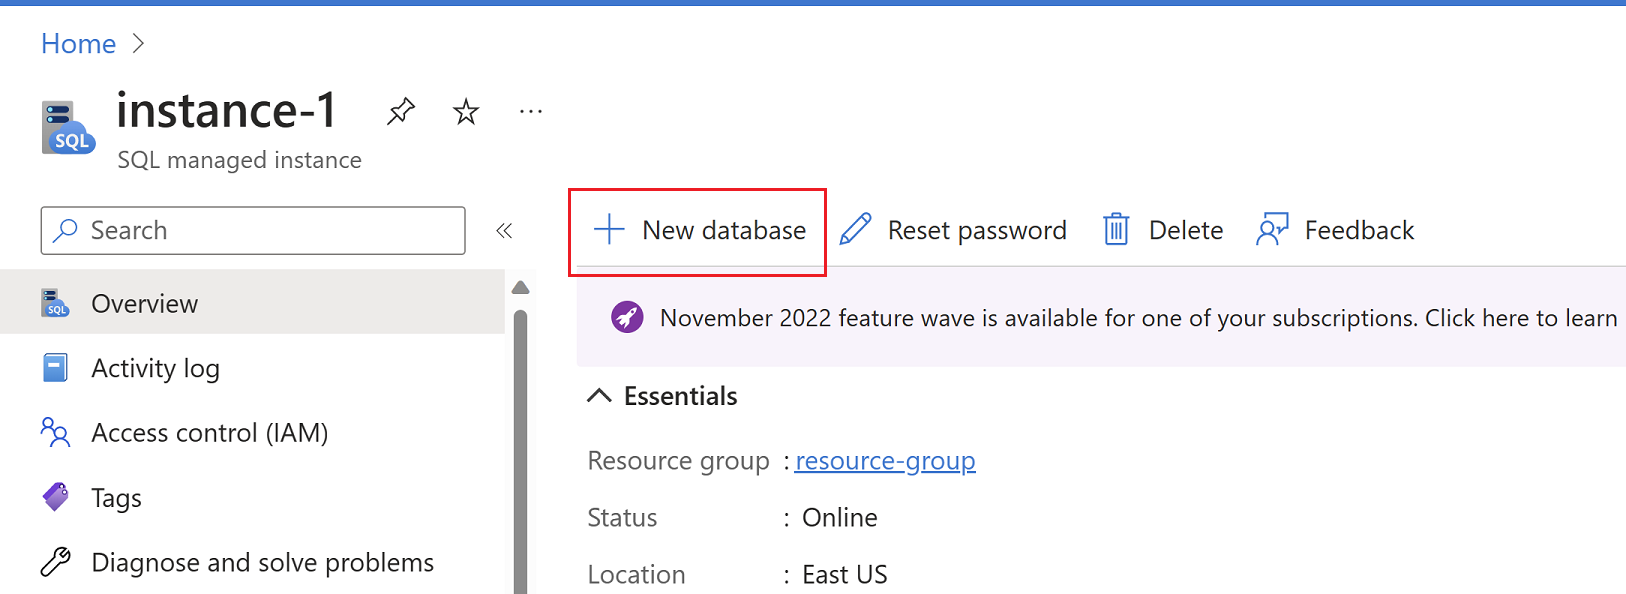
On the Overview page, choose + New database to open the Create Azure SQL Managed Database page.
-
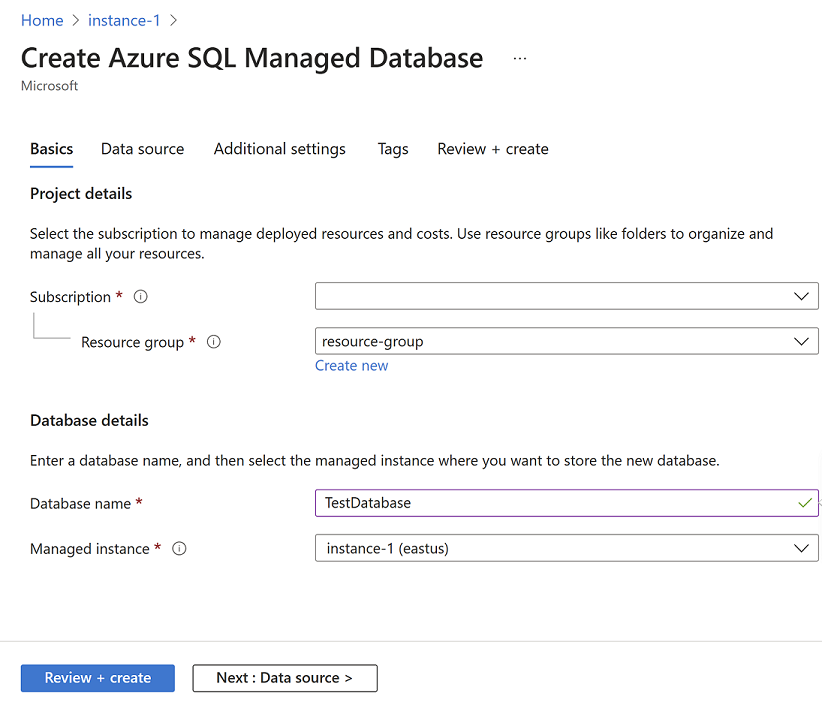
On the Basics tab of the Create Azure SQL Managed Database page, provide subscription and resource group details under Project details. Then, under Database details provide the new name of the database you plan to restore. Confirm the correct managed instance is listed in the drop down. Then select Next: Data source >
-
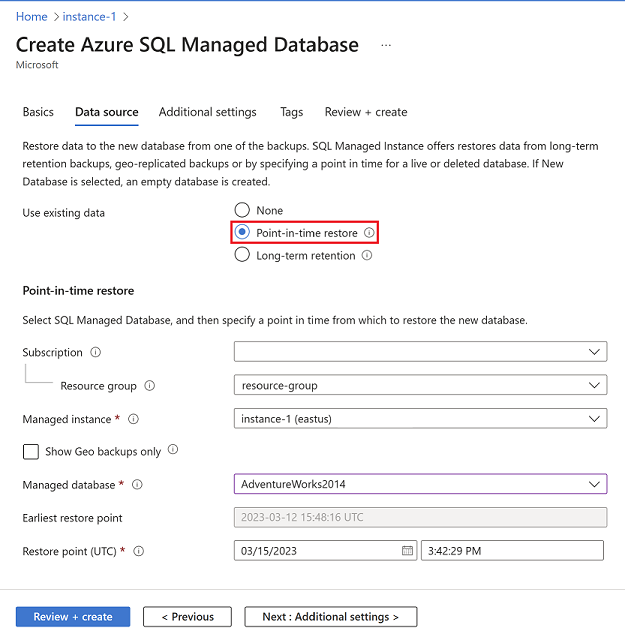
On the Data source tab, choose Point-in-time restore under Use existing data. Provide the subscription, resource group and managed instance that contains the source database. From the Managed database drop-down, choose the database you want to restore, and then choose the point in time you want to restore the database from. The source and target instance can be the same, or two different instances. Select Next : Additional settings >
-
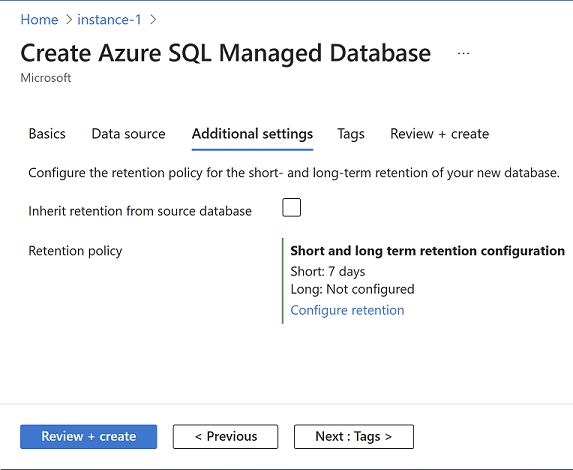
On the Additional settings tab, you can check the box to inherit the retention policy from the source database, or, alternatively, you can select Configure retention to open the Configure policies page, and set your desired retention policies for your restored database. When finished, select Review + create.
-
On Review + create, when validation is successful, select Create to restore your database.
This action starts the restore process, which creates a new database and populates it with data from the original database at the specified point in time. For more information about the recovery process, see Recovery time.
Restore a Deleted Database
To restore a deleted managed database by using the Azure portal:
-
In the Azure portal, go to your source managed instance.
-
In the left menu under Data management, select Backups.
-
Under Show databases, select Deleted.
-
For the database to restore, select Restore.
-
In Create Azure SQL Managed database, enter or select details for the target managed instance to restore your database to. Select the Data source tab.
-
In Data source, enter or select the details for your source database. Select the Additional settings tab.
-
In Additional settings, configure retention settings. Select the Review + create tab.
-
In Review + create, select Create to restore your deleted database.
](https://learn.microsoft.com/en-us/azure/azure-sql/managed-instance/media/point-in-time-restore/restore-deleted-sql-managed-instance-annotated.png?view=azuresql-mi#lightbox)
Overwrite an Existing Database
To overwrite an existing database, you must do the following:
-
Drop the original database that you want to overwrite.
-
Rename the database restored from the point-in-time to the name of the database you dropped.
Drop the original database
You can drop the database by using the Azure portal, PowerShell, or the Azure CLI.
Another option to drop the database is to connect to your managed instance directly in SQL Server Management Studio (SSMS), and then use the DROP Transact-SQL (T-SQL) command:
SQLCopy
DROP DATABASE WorldWideImporters;Use one of the following methods to connect to the database in your managed instance:
-
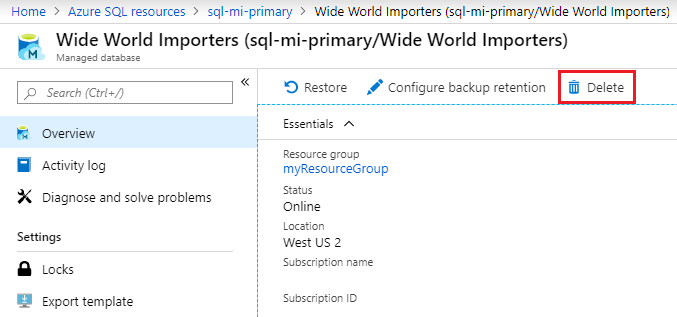
In the Azure portal, select the database in your managed instance.
-
In the command bar, select Delete.
Change the new database name to match the original database name
Use SQL Server Management Studio (SSMS) to connect directly to your managed instance. Then run the following T-SQL query. The query changes the name of the restored database to the name of the dropped database you intend to overwrite.
SQLCopy
ALTER DATABASE WorldWideImportersPITR MODIFY NAME = WorldWideImporters;Use one of the following methods to connect to the database in your managed instance: